You can easily create as many tests, personality test and multiple-choice questionnaire as you want in the interface of My Survey.
Here is how to create a new survey:
Create a new survey
- Click on « + New survey»

- Name your survey
1st Step: Create and personalize your survey
The unit “Design” allows you to add questions, pages et to set your settings.
PAGES AND QUESTIONS
- Create a question
1. Click on “New Question”

2. Choose the type of question that you want to use
The ideal types of question to create a survey are:
Single choice: One answer only is possible
Multiple choice: Multiple answers are possible
Form: Allows you to ask for information concerning your respondent (name, surname, email, phone number, numbers, text)


3. Name the question et write down the answers.
You can personalise the texts, add images, URL links, etc.

4. Move your answers thanks to the arrows to the left of each choice (drag and drop)

5. The button “New Choice” allows you to add additionals answers

- Quiz Options
The switch button “Quiz Options” allows you to display specific options for the creation of a quiz.

1. Tick the right answer(s) by clicking on the switch button on the right of your choice(s).

2. Indicate the number of points you want to attribute to the question (in case of right answer(s)).

3. Set the correction of the question.
You can display the correction of your questions as your participants answer and/or at the end of the survey.
1st OPTION: Displaying the correction as your participants answer the quiz.
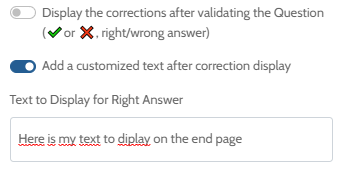
- Activate the option “Display the corrections after validating the Question (right/wrong answer)”
That option allows you to display the correction as your participants answer to the questions. The right and wrong answers will be highlighted and your respondents will read eihter “Good answer” or “Wrong answer”.
Note: If you have different questions on one page, the corrections will be displayed once the respondents will have answered to all the questions and validated the page.

- You can also activate the option “Add a customized text after correction display”
It allows you to set and display a personalised message that will appear below the correction (“Right answer” or “Wrong answer”).
This text gives you the opportunity to give precisions or explanations for each question. You can personalise the text by modifying the font and by adding images.

2nd OPTION: Displaying the correction at the end of the quiz only
- Untick the option “Display the corrections after validating the Question (right/wrong answer)”
- In the “Closing page”, activate the option “Display the Corrections”
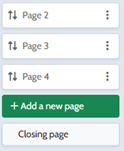

- If you want custom correction texts to appear on the closing page only, you will need to enable the “Add a customized text after correction display” for each question.
- Question form
The question form allows you to collect information concerning your respondant: first name, last name, email, phone number, text, number.
1. Choose the type of information you want to collect using the drop-down menu

2. Write the title of this information (text that will appear just before the box to insert the answer).
You can write for example: your naime, age, name of society,…

3. Tick the option “Link to the Respondent” on the right if you want this information to allow you identify your respondent in the results.
Only the information concerning the first name, last name and email can be associated with your respondents.

4. Click on “New Field” to add a new one to collect a new information;

Important :
If you collect personal information via the questionnaire, tick the “I am Collecting Personal Data” option.

This will allow you to fill in the form concerning the processing of the personnal data collected via the Eval&GO questionnaires. Those information will be available for your respondents once they will be aswering that question. In addition, you will be conform to GDPR.
You can modify this form at any moment by cliking on the “Personal Data Protection” tab from the “Edit” mode.
- Options related to the questions
To display the options, click on the 3 dots on the right of your question.

- Edit: you can modify your question
- Switch pages: you can move a question on an other page when you have at leat two pages in your questionnaire
- Copy: you can duplicate your question identically and thus save time
- Delete: warning, any deletion is final and will result in the loss of any responses already collected
Changing the order of your questions: You can change the order of your questions by sliding your mouse on the two arrows on the left of your question. Once your cursor becomes a cross, you can click on the question, move it up and down among your questions, and drop it wherever you want to place it.
- Pages
You can add many pages to your quiz. It is quite useful when you have many question to ask, whether you want to create different parts or simply display one question at the time.

- Click on “New page” on the left
- Move the pages between them by dragging and dropping with your mouse
You can move an already created question on an other page by clicking on the three dots on the right of your question.
- Pages options
Click on the 3 dots on the right of your page to display the options.
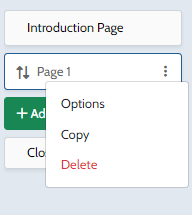
- Options: the “Reorder Questions Randomly” option allows you to display question in a random order. The questions will be displayed in a different order for each respondent.
- Copy: you can copy your page and the questions it contains, identically and to save time.
- Delete: warning, any deletion is final and will result in the loss of any responses already collected.
- Logo
Click on the button “Add a logo” on the top of the page to download your image.
Your logo will be displayed on the top left of your quiz page.

- Header title
Click on the “Add a Title in the Header” button to display the title in your quiz (it will be displayed in the top right of your page).

- Footer
Click on “Add a Footer” to set a message that will appear at the bottom of each of your page for your quiz.

- Delete the Eval&GO brand
By activating that option, you can take off our brand from the link and the bottom of the page of your quiz. Then, there won’t be any mention of Eval&GO in your quiz.

- Introduction Page
Click on “Introduction Page” to set a message that will be displayed when your respondent will start the quiz.
- Closing page
Click on the Closing Page to insert the elements you wish to display to your respondents once they are done answering your survey.

From here, you can configure your end page as desired by inserting the desired elements and configuring them as required.

Quiz options
The quiz options allow you to create a scored questionnaire where correct and incorrect answers can be displayed. At the end of the quiz, you can display the correction, the respondent’s score and personalized messages based on the score obtained.

MULTI-SCORING OPTIONS
8. Multiscoring options
The “Multiscoring” function gives you the opportunity to assign points to your questions based on different criterias or themes.
Furthermore, multiscoring is used to create personallity tests.
By using that functionnality, you will be able to activate the options corresponding to the closing page.

ADDING A TIMER
It is possible to set a time limit to asnwer to the quiz by adding a timer (PRO+ account).
1. Click on the “timer” tab

2. Set a timer for the entire questionnaire or for each page, individually.
The time must be indicated in seconds.

Your respondents will see the timer displayed on the top of the page.
At the end of the time limit, they will no longer be able to answer the questions on the current page (in the case of a page timer) or all the following questions (in the case of a global timer).
Note: you can also view the response time of each responsdent from the “Results” unit, “Results per Respondent” tab.
DESIGN
You can personalise the design of your quiz from the design tab by clicking on the “Design” tab.
A library is available. Click on the design of your choice to apply it to your quiz.
To know more about the Design tab, click HERE

2nd step: Test your survey with the preview option
You have the possibility to test your questionnaire in order to share it with your participants thanks to the preview option.
Then, you would have the possibility to check if all your questions are well set.
The answers you generate from the preview will be visible from the results and will be marked “Answered during Preview Mode”.
You can delete those answers from the “Results” module, in the “Results per Respondent” tab by clicking the “Delete responses given in Preview Mode” red button.
3rd: Share your quiz to your participants
There are different methods to share your quiz:
ANONYMOUS AND UNIQUE URL LINK
You can share that one and only link to all your participants.
That link can be sent by email, shared on a website or social networks. It allws you to collect anonymous answers (except if you asked for the identity of your respondents in your quiz).

SHARING BY EMAIL AND ON SOCIAL NETWORKS
Those pisctures allow you to directly share your quiz on Facebook and Twitter, or to access your messaging service to send it by email.

QR CODE
Click on the QR code to download it on your computer. Your participants can have access to your quiz by flashing the QR code.

INTEGRATE A SURVEY ON YOUR WEBSITE
Click on “Get the code” to set your embed code.

EMAILING PLATFORM
You can send your survey or schedule its sending from your emailing platform and make follow-ups. Before sending your survey, it is important to import the contacts in the “My contacts” unit. Create your own designed email from the “Email” tab in the “Publish” unit. Choose the contacts to whom you want to send your survey, and set the desired options. You can get nomintative or anonymous answers, receive an answer per person or allow to answer more than once…

4th step: Analysing your results
The “Results” unit allow you to preview general statistics concerning your quiz, results per question or results per respondent.

1. Summary
The summary shows you data and general statistics concerning all your respondents.
- Cumulated answers collecte over time.
- The total number of participants and the distribution of “finished” and “in progress” questionnaires.
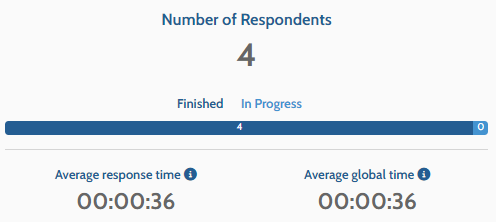
- The average global time and response time are computed over the whole collected responses and allow ou to know the average time your participants took to take your questionnaire.
Average response time: it corresponds to the average time participants took to answer to the different questions. It doesn’t include the time reading the corrections.
Average global time: it corresponds to the average time spent on the survey. It includes the reading time of the corrections.

- The pages chart shows the number of respondents for each page of your survey, the average time spent on each pages with the dropout rate.
- If you have assigned points to your questions, you will get a minimum and maximum score among your respondents. In addition, you will get the average score in points and percentage.
2. Scores per respondent
A chart sum up the score(s) of ezach of your respondents and their contact details if the collected answers are nominative.
3. Results per page
You can also view results page per page.
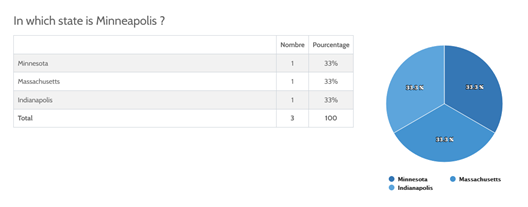
We provide a table and a graph for each question in your quiz.
The distribution of answers per participants in number and percentage will also appear.
4. Sharing results
The “Publish” button (located in the “Results” unit of your quiz, in the top right “Results per question” tab) allows you to publish the report on line. You can share the results of your quiz to your relatives, colleagues, students, clients… The online report updates itself in real time.
Results per respondent
1. List of respondents
You can visualize the list of your respondents from the Results per respondent tab.
 Start date: indicates what day your respondent started answering your quiz
Filing: indicates if the questionnaire is in progress or finished
Preview mode: indicatesif the question has been answered in preview mode
First name, last name, email: those are the information about your respondent. Those information are displayed only if you have used a form question and have ticked the “associate to respondent” option
Score and percent: indicates in the score obtained by the respondent in total points ans percentage
Responses: the “view details” button allows you to view question by question the details of the responses of your respondent and the time they took to answer your questionnaire. You can also export the responses in a PDF format.
Result page: the “Open” button allows you to visualize the closing page of your respondent
Deleting an answer: click on the 3 dots on the right of each line
2. CSV Export
You can export all your responses in a CSV formart an add to it some information, such as the total score, answering time, date, etc… CLICK HERE to know more about personalising your export.

Summary of SURVEY features by account type
You can view the Survey features for each account type HERE
