You can see and create new groups of contacts in the “Contact Manager” tab and then by clicking on “My Groups”.

Click on the green “Add a Group” button, name your group and click on “Confirm”.
You can see the list of your groups, the number of contacts in each one of them, the list of the members.
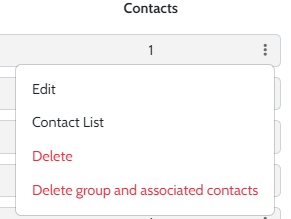
If you click on the three dots to the right of a group name, you have several options:
Edit: rename your group name
Contact list: view the list of contacts in your group. Clicking on the red man to the right of a contact removes it from the group.
Delete: delete the group itself, without deleting the contacts
Delete group and associated contacts: delete the group and its contacts
As mentionned, you can remove one or several contacts of a group by clicking on Edit, then on the red guy on the right of each contact.
Groups can also be created while adding a new contact.
In the “Contact manager” tab, click on “New contact”. You can create your contacts one by one by by filling in the desired fields. You can create a group on the right. Enter the name of the group and click on the blue “Add a group” button. Don’t forget to tick the “I hereby certify that imported contacts are “Opt-In…” box and to validate.

Finally, you can create a group while uploading a contacts file.
In the “Contact manager” tab, click on “Import contacts”. Select your file and indicate its format, if it has a header, place the columns in the same order as your CSV file. You can create a group. Fill in the name of the group and click on the blue “Add a group” button. Don’t forget to tick the “I hereby certify that imported contacts are “Opt-In…” box and to validate.
